Summary
This post pulls back the curtain on the "magic" behind email open notifications. We break down the Tracking Pixel, a tiny 1x1 transparent image that triggers a server request the moment an email is viewed.
Key takeaways include:
The Workflow: A 4-step deep dive into how a unique URL is generated, "fired" by an email client, and processed by a server.
Security & Data: How developers use secure hashes to validate requests and update database statuses in real-time.
Automation: How tracking events can trigger instant alerts via Gmail or project management tools like Monday.com.
The Fallback: Why professional systems use link-click detection as a backup for environments that block images.
Ever wonder how services like Mailchimp or HubSpot track when an email is opened? It feels like magic – you send an email, and a few minutes later, you get a notification that the recipient is reading it.
There’s no “Read Receipt” popup and no manual confirmation required from the user. Instead, this is powered by a clever piece of web technology known as a Tracking Pixel.
In this post, we’ll break down what a tracking pixel is, the technical workflow of how it “fires,” and how you can implement a professional-grade tracking system in your own applications.
What is a “Tracking Pixel”?
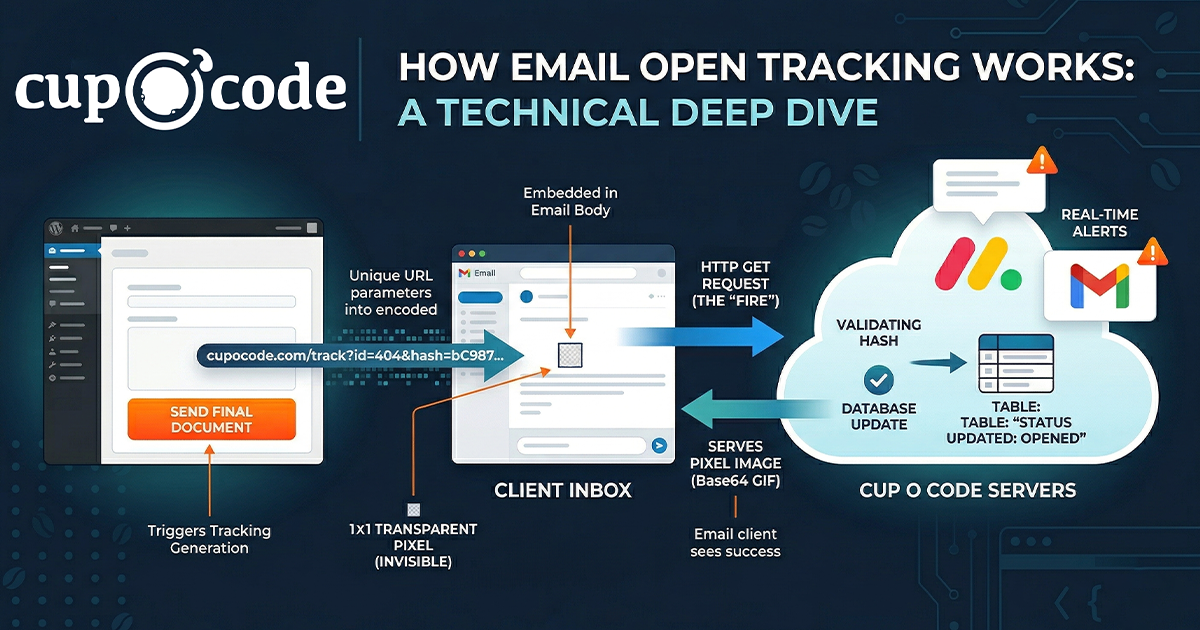
A tracking pixel (also known as a “Web Beacon” or “Clear GIF”) is a tiny, 1×1 pixel image embedded into the HTML of an email.
Because it is only one pixel in size and transparent, it is completely invisible to the human eye. Its primary purpose isn’t visual; it is designed to trigger a request to a server the moment the email client loads the message.
Technical Explanation: How It Works
1. Generation & Embedding
When an email is prepared for delivery, the system generates a unique tracking URL for that specific message. This URL usually contains two components:
- The Unique ID: A reference to the specific document or record you are tracking.
- A Secure Hash: A unique “key” that prevents unauthorized users from guessing tracking links.
The final email includes a standard <img> tag where the source (src) is this unique URL: <img src="https://yoursite.com/track?event_id=101&token=aB123...">
2. The HTTP Request (The “Fire”)
When the recipient opens the email, their email client (like Gmail, Outlook, or Apple Mail) attempts to download all images to display the content. At this moment, the client sends a standard HTTP GET request to your server’s tracking URL. This request acts as the “signal” that the content is being viewed.
3. Server-Side Processing
When your server receives this request, it performs several tasks in the background:
- Security Validation: It verifies the secure hash/token against the database to ensure the request is legitimate.
- Database Update: If valid, the system updates the status of the record from
senttoopened. - Timestamping: It records the exact moment the server was “pinged.”
- Automation: This can trigger real-time notifications, Slack alerts, or CRM updates.
4. The Response (Serving the Image)
To prevent the email client from showing a “broken image” icon, the server must return an actual image file. The system sends a specialized header (Content-Type: image/gif) followed by a Base64-encoded string that represents a single transparent pixel. To the email client, it looks like a successful, normal image download.
The Fallback: Why Tracking Pixels Aren’t 100%
Some corporate email systems block external images by default for privacy. To ensure you still get data, professional systems use Link Click Fallback Logic.
If a user clicks a link within the email (like a “View Document” button), the system checks if the pixel has already “fired.” If it hasn’t, the system manually marks the record as “viewed” upon the page load. This ensures that even if the invisible pixel was blocked, the user’s interaction is still recorded.
Implementation Example (PHP/WordPress)
If you are building your own tracking system, here is the logic required to handle the request and serve the pixel.
Step 1: Registering the Tracking Variables
You need to ensure your application recognizes the custom parameters in the URL.
// Registering variables to recognize the tracking request public function register_tracking_vars( $vars ) { $vars[] = ‘event_id’; // The ID of the item to track $vars[] = ‘tracking_hash’; // Security verification return $vars; }Step 2: Handling the Request & Serving the Image
This function captures the incoming ping, validates the security token, updates your database, and finally serves the transparent 1×1 GIF.
public function handle_tracking_pixel() { $event_id = get_query_var( ‘event_id’ ); $hash = get_query_var( ‘tracking_hash’ ); if ( ! empty( $event_id ) && ! empty( $hash ) ) { $stored_hash = get_metadata_value( $event_id, ‘secure_hash’ ); // Security check: Hash must match your records if ( !empty($stored_hash) && $stored_hash === $hash ) { // Update status to ‘opened’ in your database $this->record_activity($event_id, ‘opened’); // Serve the 1×1 transparent GIF header(‘Content-Type: image/gif’); echo base64_decode(‘R0lGODlhAQABAIAAAAAAAP///yH5BAEAAAAALAAAAAABAAEAAAIBRAA7’); exit; } } }Step 3: Updating Activity
To avoid “double-counting” and ensure data integrity, the system should only record the first time the email is opened.
private function record_activity($id, $method = ‘opened’) { $current_status = get_status($id); // Only process if the item hasn’t been recorded as opened yet if ($current_status === ‘sent’) { update_status($id, ‘opened’); update_timestamp($id, current_time(‘mysql’)); // Trigger external notifications (e.g., Email alerts or Webhooks) $this->trigger_alerts($id, $method); } }Why Use This Method?
- Non-Intrusive: There are no “confirm delivery” popups to annoy the recipient.
- Real-Time Data: You receive data the moment the recipient is engaged with your content, allowing for timely follow-ups.
- Industry Standard: This is the exact method used by global marketing leaders to measure engagement and ROI.
By implementing your own tracking pixel logic, you can move away from “sending and hoping” and start making data-driven decisions based on how your audience interacts with your communications.